
Cab Study This week we take a look at various locomotive cabs. It is to be expected that the cabs of different manufacturers would be somewhat different. Likewise you would expect that the cabs of one manufacturer would vary between its different models. What may be unexpected is the differences that occur between the same locomotive models that are owned by different railroads.
GP60M First I'll start off with a rerun. The Tales page for 3/21/00 was a Cab study of a GP60-M. You may want to refer back to that page to see the GP60M cab.
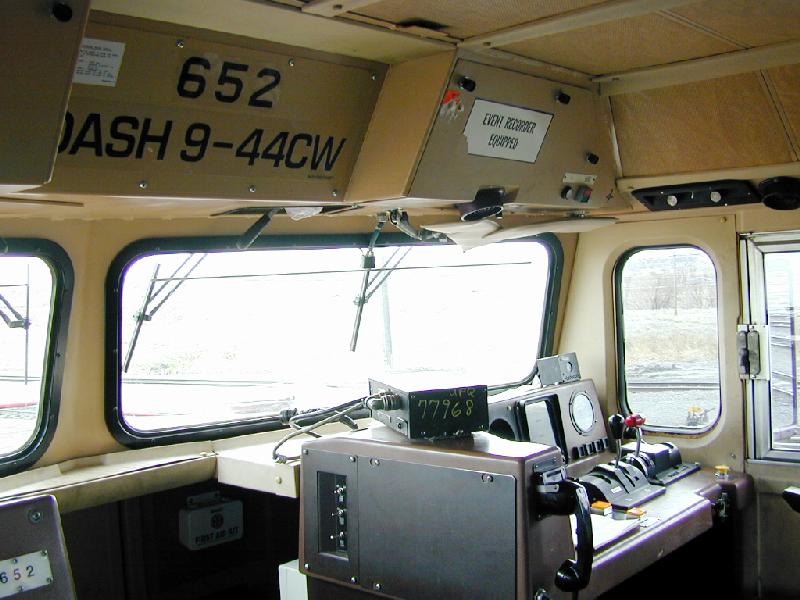
Early Dash 9 Here we'll take a tour of the cab on an early C44, ATSF 652. You can see from this photo that it is very similar to the GP60M.
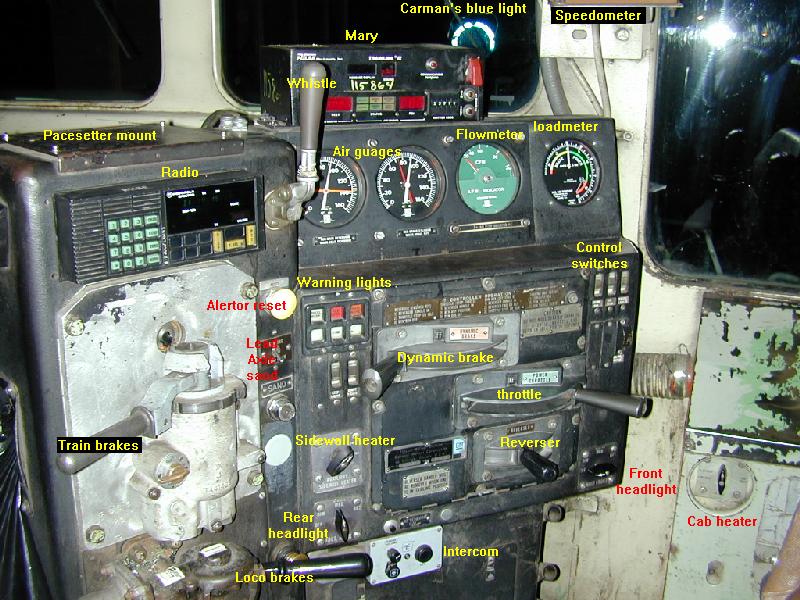
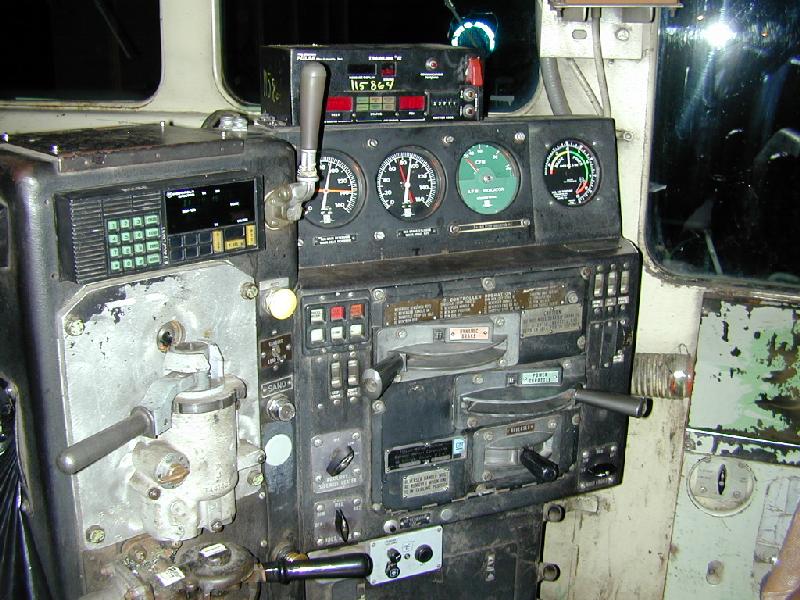
Next a close up of "Mary". Out here we call the head end receiver device "Mary". This is the blackbox that recieves the radio signals from FRED, the rear end device that took the place of cabooses, and displays the pertinent information for the engineer. "Mary" also sends the rear end of train emergency signal back to the FRED if needed. I don't know where the term Mary came from. Perhaps because it is the box that is married to Fred?
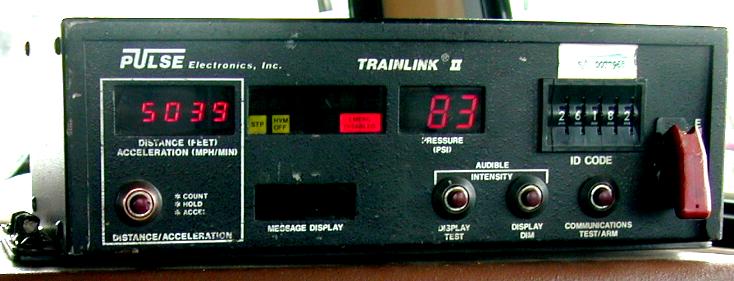
Starting at the top left is the distance counter. It is used to tell the engineer when the rear end of his train is in the clear in a siding or yard track or any other time he needs to measure distance. To start the distance counter you push the single purple button below it. To stop the counter press the same button again. To reset the counter to zero to ready it for the next count just press the button a third time. SIMPLE. Compare this ease of operation with the multiple key presses you have to make on computerized units to do the same thing. The red digits are reading 5039 feet. When you are not using the footage counter this display acts as an accelerometer. It shows the gain or loss in mph you will get if you keep accelerating/decellerating at your current rate for the next minute.
The 2 small green squares in the center panel are lights showing the status of various items on Fred. These two lights are labled "STP" for stopped, fred is not moving, and "HVM OFF" for High Visibilty Marker Off, in other words Fred's red strobe is off. The larger red square light says "Emergency Disabled" meaning this Mary has not yet been armed to this Fred and you cannot initiate an emergency application of the airbrakes from Fred at the rear of the train. All of these lights have counterparts just above them that would read "Moving", HVM On", and "Emergency Enabled" if those were the cases.
The dark display panel below those just discussed is labeled "Message Display". Here you get messages from Fred such as "Low Air Pressure" or "Arm Now".
The digits reading "83" is the air pressure on Fred at the rear of the train.
Just to the right of the "83" are the 5 thumbwheel switches where you dial in the I.D. number of the Fred that is on the rearend of your train. In this picture it is reading 26182.
The red cover at the far right of Mary covers the emergency switch. If you need to put the train into emergency airbraking at the rearend you lift this cover and press the switch underneath it. This causes the Fred to dump the brakepipe air at the rearend of your train.
The 3 purple buttons under the I.D. code are pretty self explanatory except you can do a few more things with them than just what their labels say. For instance, if you press the Test button it tests all of Mary's little displays and lights to see if they are working. Hold the test button in and the footage counter display will show you the diameter of the drivewheel from which the counter gets its distance measuring signal. You can calibrate this value by turning thumbwheel switches under a cover on the back of Mary. I always calibrate my Marys in this manner at a known good mile. By doing so you can get footage measurements that are accurate to within +/-5 feet per mile. At the same time the footage counter display is showing the wheel diameter, the air pressure display will show how many "Charge Units" have been used from Fred's battery. Another use for these buttons is to find the I.D. number of an unknown Fred. By pressing and holding both the Test button and the counter button the combination of the counter display and the pressure display will show the I.D. number of the last Fred transmission this Mary has recieved. By repeatedly doing this you might be able to find your own Fred number before the carman radios it to you. Or you can find the Fred number of a train ahead of you on the road. This is handy. If he is stopped ahead of you and it is 3am you can search and find his Fred. Then dial it into YOUR Mary. Now YOUR Mary monitors HIS Fred. Take a nap. When he finally releases his air or starts to move, your Mary will beep at you waking you up. Now you can re-dial in your own Fred and continue. This is another feature that the modern computerized locos with their built in software Marys don't have. (Yes your Mary is still armed to your Fred when you return).
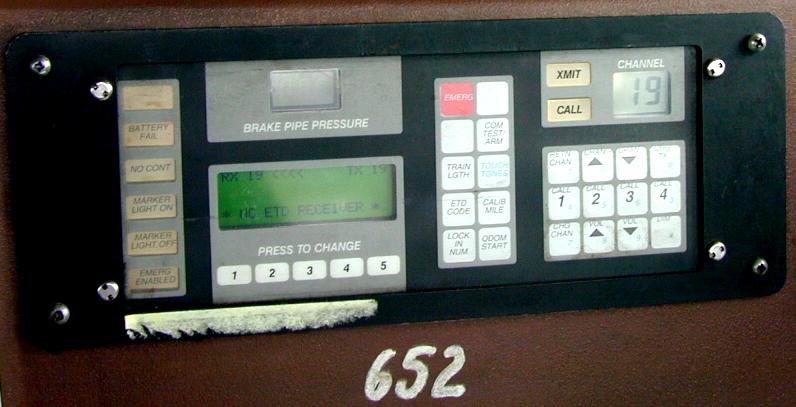
This is a closeup of the dreaded Colt radio heads that so many former ATSF units have. I hate them. So does everybody else I know that uses them. The left 2/3rds of the thing is actually a Mary (Head End Reciever for Fred). Thank goodness they are no longer used. The communications radio is the righthand 1/3rd. The current channel and transmit and call lights are in the upper right corner.
The membrane type keypad below these is a real pain in the butt. To change channels you have to press the "Chg Chan" key at the lower left of the keypad. Then you have to press and hold either the channel up or the channel down keys (the keys with the dark triangles near the top of the keypad) while the channel display slowly counts up or down one channel at a time. Do you have any idead how long this takes to get from Channel 70 to channel 15? All the while I am supposed to be driving the train! I have to switch to four different channels during my trip and often have to change back & forth several times. It is a real pain. There is a sort of short cut if you re-use only the same two channels. You can press the Chg Chan button and then the "Retn Chan" button (top left of keypad) and it will toggle between the current channel and the last channel used. To call up a dispatcher you have to first press the "Touch Tones" key (midway down the rightside of the center keypad) then press the appropriate touchtone numbers on the main keypad. Can you SEE the touchtone numbers on that keypad? No you can't. They are small faint blue numbers on each key below the other labels on those keys. You can't seethem on this photo in good light. I sure as hell can't see them on a bouncing loco at night by the dim cab light. The keypads are NOT lighted. The faint blue touchtone numbers on these keys are in no logical or standard order either so you can't just use it by position like a calculator pad. Additionally, if when in touchtone mode (you got there for a timed few seconds by pressing the "Touch Tones" key) you hold your pinky on the key a second too long you get DOUBLE TONES! The wayside radios don't recognize 6644 as the dispatcher call number of 64 and refuse it. Try the whole process again. These things suck!
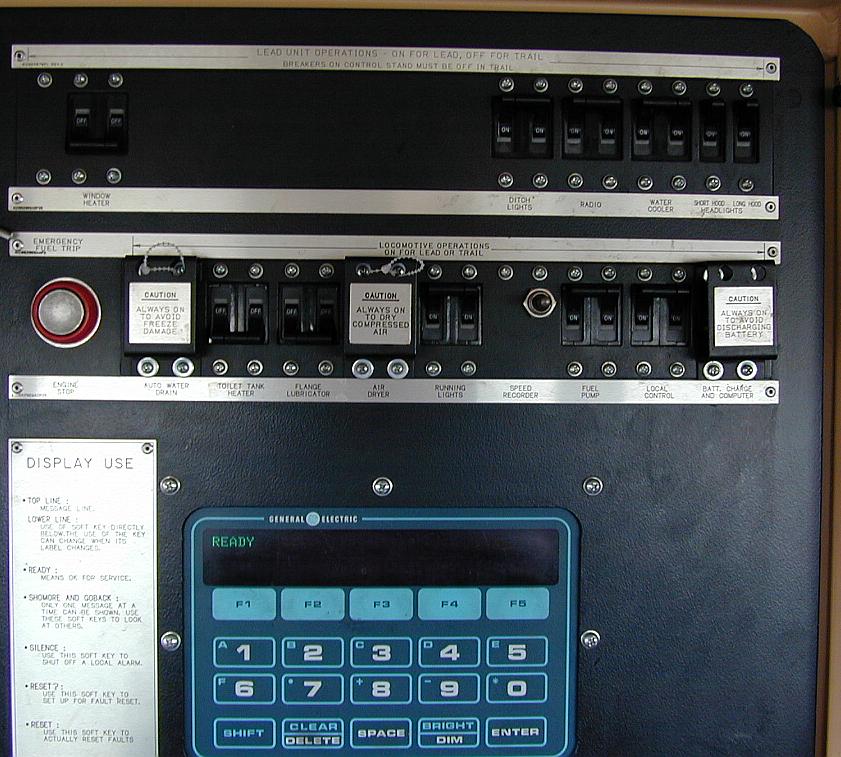
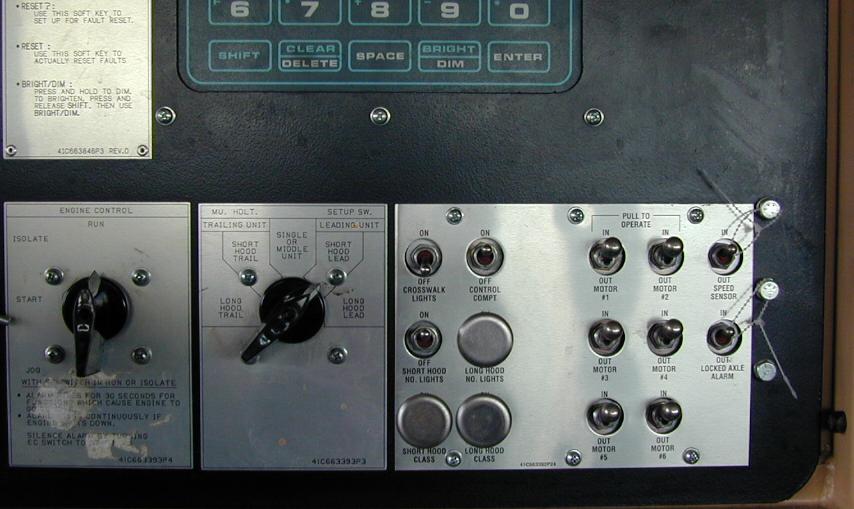
These two pics show the C44's "engine control panel". This is the electrical panel on the back cab wall directly behind the engineer. It contains the circuit breakers, engine control computer, engine shut down switch, Isolation switch, MU headlight setup switch, Traction motor cutout switches, etc. The blue computer is where the engineer or maintenance people look at the loco's fault history and/or reset faults such as ground relays.
Next is the conductor's side of the unit. From left to right is the speedometer, emergency brak valve, radio keypad, and his own lighted numberboard. The square yellow button below the desk is a whistle (horn) button. Next to it you can barely make out the black top of his radio handset. The cream colored box under the right side of his desk is the refrigerator.
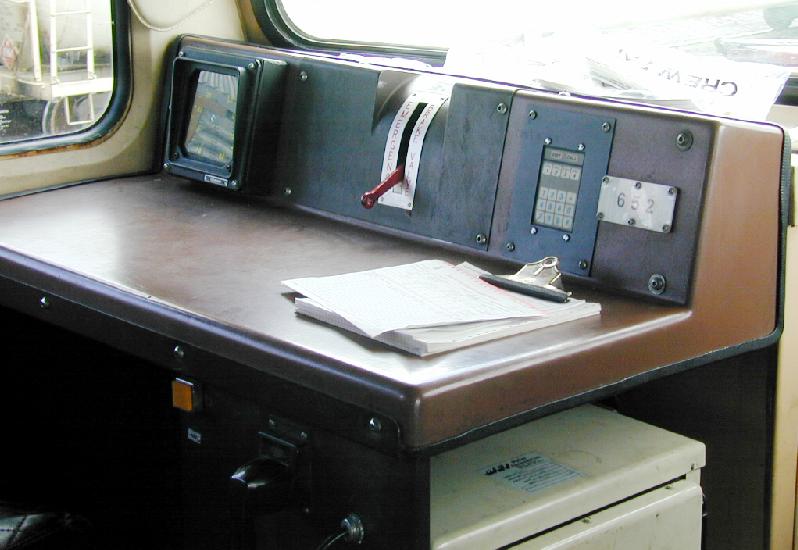
This last picture of the ATSF 652's cab is this view of the engineer's station from the conductor's perspective.
The 3 switches in the middle of the pic are light switches for the nose, toilet compartment, and cab.
The 2 silver knobs on the sidewall above the small window are the engineer's wiper controls with a light switch between them.
The circular thing above the windshield and under the white "Event Recorder Equipped" sign is the engineer's reading light. It is a dimmer equipped light that illuminates the area of the desktop where the papers (track warrants) are laying.
SD40-2 The best control stand ever developed....the good old SD40-2 work horse. Jack of all trades. Comfy. Controls naturally placed. Plenty of leg room. It works great for high speed road travels or switching and is OK for reverse movements.
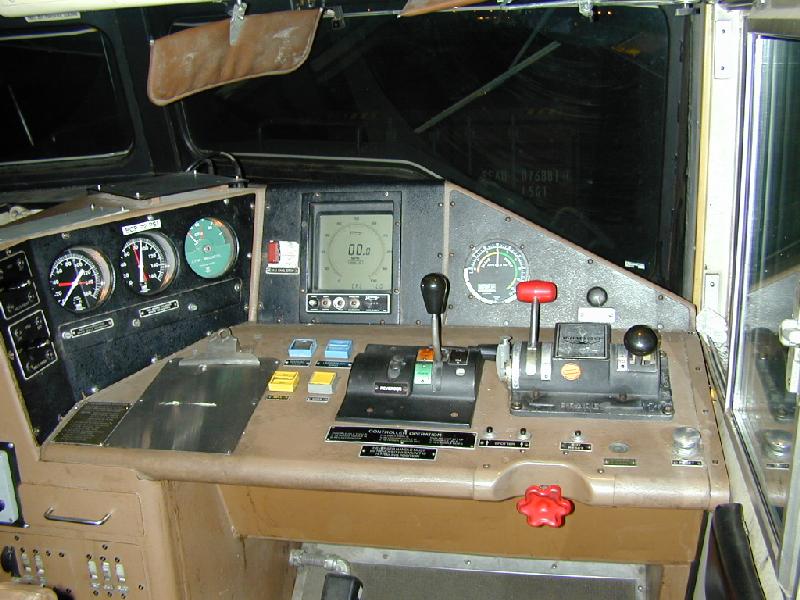
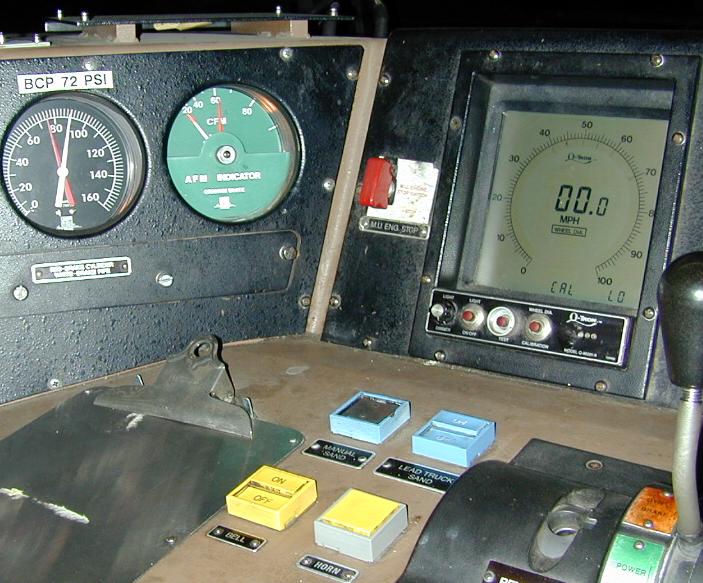
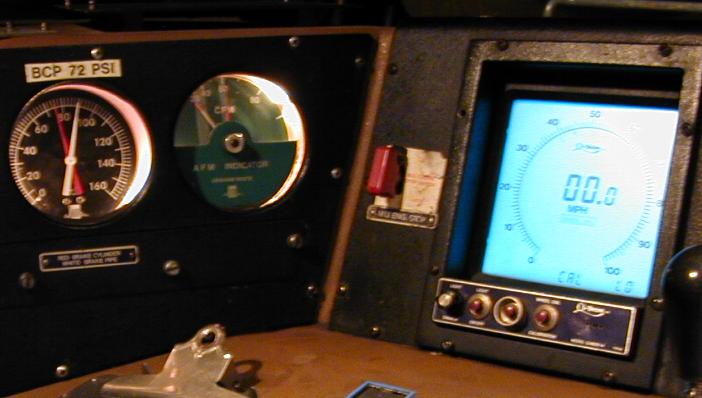
Close up of one airbrake gauge, the Flowmeter, and the Q-tron speedometer.
I don't really care for the Q-Trons. They are Liquid Crystal Displays (LCD) and as such have limited contrast. For the first two pics I used a flash and they are about ideal lighting and angle for these speedos. Believe me, they can get much worse in other lighting levels and viewing angles. Forget wearing polarized sunglasses with these units. LCDs work on the principle of polarized light and all of the markings disappear the second you put on polarized sunglasses. All you see is a blank screen.
Notice the Horn button. Its entire top is active but the high frame around the outside prevents pressing it with anything other than a few fingers. At least it is better than the SD70MACs (later).
I do kind of like the cool blue backlighting of the Q-Trons though. This pic was taken just seconds later. Here is what it actually looked like without the flash, and the backlight of the speedo shows brighter than what it actually is.


| Return to Tales index | My Home Page | E-Mail me |
Created 08-05-2000
Updated 09-25-2002